
The current trend in the software industry is to integrate artificial intelligence (AI) into applications. You may have heard of ChatGPT has significantly improved the quality of chatbots. In this article, I will show you how to build a chatbot with speech recognition capabilities using Azure Cognitive Services and Azure OpenAI.
Introduction
The idea of a chatbot is not new. It has been around for decades. However, ChatGPT (and OpenAI) is a game-changer. It also provides you with APIs to build your own chatbot. But the API can only return text. What if we want to build a chatbot that can speak? You can talk to it, and it can understand you and talk back to you. Thanks to Azure Cognitive Services, we can build a chatbot with speech recognition capabilities in a few steps.
The chatbot we are going to build is a simple one. We will demonstrate how to use Azure OpenAI Service and Azure Cognitive Services to build a chatbot that can talk. Then you can use more advanced prompts to build your own chatbot.
The code in this article is available at my GitHub repository: https://github.com/yanxiaodi/MyCodeSamples/tree/main/Chatbot.
Prerequisites
To follow this article, you need to have the following:
- An Azure account. If you don’t have one, you can create one here. You can get some free credits for some services.
- An OpenAI account or an Azure OpenAI Service account. You can create an OpenAI account here. You will be granted $18 worth of free credits. Azure OpenAI Service is similar to OpenAI, but it is hosted on Azure and managed by Microsoft. Access to Azure OpenAI is currently limited to a small number of users. You can apply for access here.
- Visual Studio or Visual Studio Code.
In this article, we will use Azure OpenAI Service. But it is easy to switch to OpenAI. You just need to change the API endpoint and the API key.
Create an Azure OpenAI Service
To create an Azure OpenAI Service, you need to have an Azure account. Log in to the Azure portal, and click Create a resource. Search for OpenAI and select OpenAI. You will be asked to provide a name for the service, a subscription, a resource group, a location, and a pricing tier. You can choose the free tier for now. You can always change it later.
Navigate to the Azure OpenAI Service. In the left navigation pane, click Keys and Endpoint. You will see the API endpoint and the API key. You will need them later.
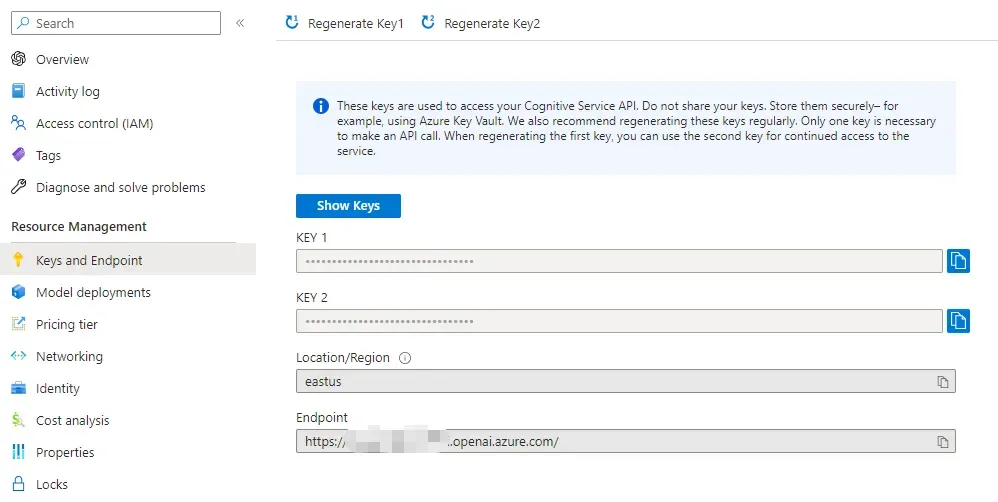
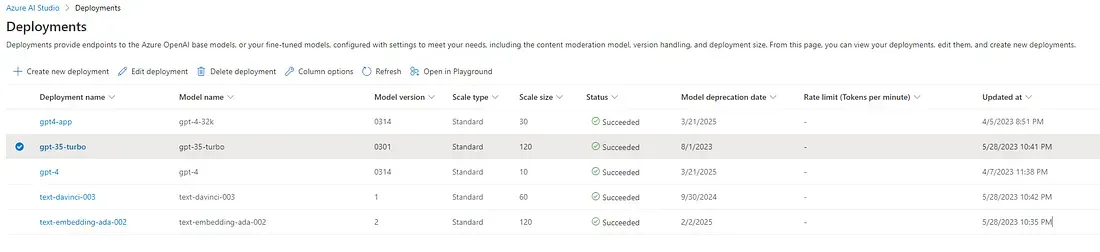
Then we will need to deploy an OpenAI model. Click Model deployment, and then click Manage Deployments, you will be navigated to the Azure OpenAI Studio. Azure OpenAI Service now supports the following models:
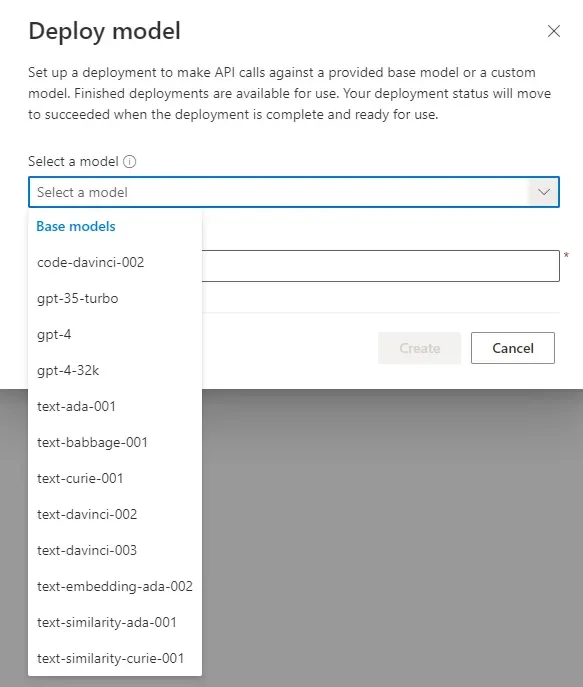
There are many models here. These models are grouped by their capabilities, as shown below:
- GPT-4: The most powerful model so far. GPT-4 includes gpt-4 and gpt-4–32k. They improve on GPT-3.5 and can understand as well as generate natural language and code. gpt-4 supports 8192 max input tokens, while gpt-4–32k supports 32768 max input tokens.
- GPT-3: A set of models that can understand and generate natural language. This includes gpt-35-turbo (ChatGPT), text-davinci-003, text-curie-001, text-babbage-001, and text-ada-001.
- Codex: These models are trained for code generation. This includes code-davinci-002 and code-cushman-001.
- Embeddings: These models can use embeddings, which is a special format of data that can be used to train machine learning models.
For this article, we will use gpt-35-turbo because it is for chatbots. You can also use gpt-4 or gpt-4–32k but they are more expensive. Click Deploy to deploy the model.
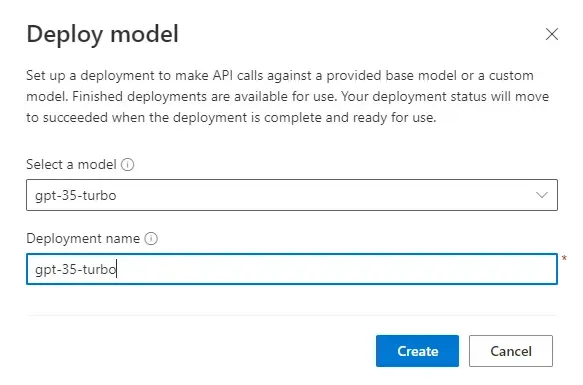
After a few minutes, the model will be deployed. You can click Manage Deployments to see the status.
Create a Speech Service
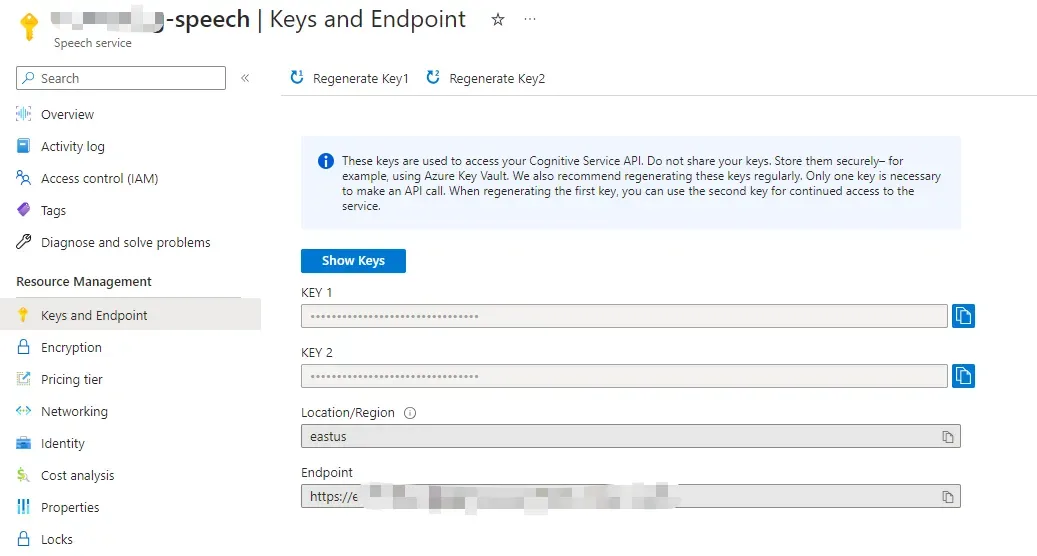
We will use Azure Cognitive Service to recognize user’s speech, and then convert the chatbot’s text response to speech. To do this, we need to create a Speech Service. In the Azure portal, click Create a resource, search for Speech, and select Speech. You will be asked to provide a name for the service, a subscription, a resource group, a location, and a pricing tier. You can choose the free tier for now. You can always change it later.
Navigate to the Speech Service. In the left navigation pane, click Keys and Endpoint. You will see the API endpoint and the API key. You will need them later.
Now all the resources are ready. We can start building the chatbot.
Create a Console Application
Open Visual Studio or Visual Studio Code, and create a new console application. You can also use dotnet CLI to create a console application by running the following command:
dotnet new console -o ChatbotThen add the following NuGet packages:
dotnet add package Azure.AI.OpenAI
dotnet add package Microsoft.CognitiveServices.Speech
To support non-English languages, you can also add the following code to specify the encoding:
Console.InputEncoding = Encoding.Unicode;
Console.OutputEncoding = Encoding.Unicode;
This allows you to show non-English characters in the console, such as Chinese characters.
Build the Chatbot
First, let us understand the fundamental concepts of Azure OpenAI Service. There are two types of OpenAI APIs:
- Chat Completion API: This API accepts a prompt which contains the conversation history and the user’s input, and returns the chatbot’s response.
- Completion API: This API accepts a prompt which is a string of text with no specific format rules.
To build a chatbot, we need to use the Chat Completion API, which helps the chatbot understand the conversation context so that it can generate a more accurate response.
Create a new class called VoiceChatbox and add the following code:
public static async Task Chat(OpenAIClient openAiClient)
{
    Console.WriteLine("Hello, World! Ask a question. Press q to exit.");
    var chatMessages = new Queue<ChatMessage>();
    // Create a system message to specify the role of the chatbot.
    var systemMessage = new ChatMessage(ChatRole.System, @"You are an AI assistant that helps people find information.");
    while (true)
    {
        Console.WriteLine("User: ");
        var userMessageString = Console.ReadLine();
        if (userMessageString?.Trim().ToLower() == "q")
        {
            Console.WriteLine("Goodbye!");
            break;
        }
        var userMessage = new ChatMessage(ChatRole.User, userMessageString);
        // Add the user message to the chat history.
        chatMessages.Enqueue(userMessage);
        // Remove old messages to avoid exceeding the max input tokens.
        // Adjust the number of messages to remove based on the max input tokens of the model.
        // You can also use other methods to avoid exceeding the max input tokens.
        while (chatMessages.Count > 20)
        {
            chatMessages.Dequeue();
        }
        // Create a chat completion request.
        var options = new ChatCompletionsOptions
        {
            Temperature = (float)0.7,
            MaxTokens = 500,
            NucleusSamplingFactor = (float)0.95,
            FrequencyPenalty = 0,
            PresencePenalty = 0,
        };
        // Add the system message and the chat history to the prompt.
        options.Messages.Add(systemMessage);
        foreach (var chatMessage in chatMessages)
        {
            options.Messages.Add(chatMessage);
        }
        // Call the Chat Completion API.
        var response = await openAiClient.GetChatCompletionsStreamingAsync("gpt-35-turbo", options);
        using var streamingChatCompletions = response.Value;
        var assistantMessageStringBuilder = new StringBuilder();
        Console.WriteLine("Assistant: ");
        // Get the chatbot's response and print it to the console.
        await foreach (var choice in streamingChatCompletions.GetChoicesStreaming())
        {
            await foreach (var item in choice.GetMessageStreaming())
            {
                assistantMessageStringBuilder.Append(item.Content);
                Console.Write(item.Content);
            }
        }
        Console.WriteLine();
        // Add the chatbot's response to the chat history.
        var assistantMessage = new ChatMessage(ChatRole.Assistant, assistantMessageStringBuilder.ToString());
        chatMessages.Enqueue(assistantMessage);
    }
}
You can follow the comments to understand the code. The code is pretty straightforward. One thing you need to pay attention to is the options variable. It contains the parameters that control the chatbot’s response. You can adjust these parameters to get a better response. For example, you can increase the MaxTokens to get a longer response. You can also increase the Temperature to get a more creative response. For more information about these parameters, see here. You can also find more on OpenAI docs, see here.
Another thing is that we use GetChatCompletionsStreamingAsync method to get the chatbot’s response. There is another method named GetChatCompletionsAsync, which also can get the response. The difference is that GetChatCompletionsAsync returns the response after the chatbot finishes generating the response, while GetChatCompletionsStreamingAsync returns the response in streaming while the chatbot is generating the response. The streaming method is more suitable for chatbots because it allows the chatbot to respond to the user’s input immediately, rather than waiting for a long time to finish generating the response.
In the program entry point, we can create the OpenAI client and call the Chat method:
var openAiClient = new OpenAIClient(new Uri("YOUR_API_ENDPOINT"), new AzureKeyCredential("YOUR_API_KEY"));
await VoiceChatbot.Chat(openAiClient);
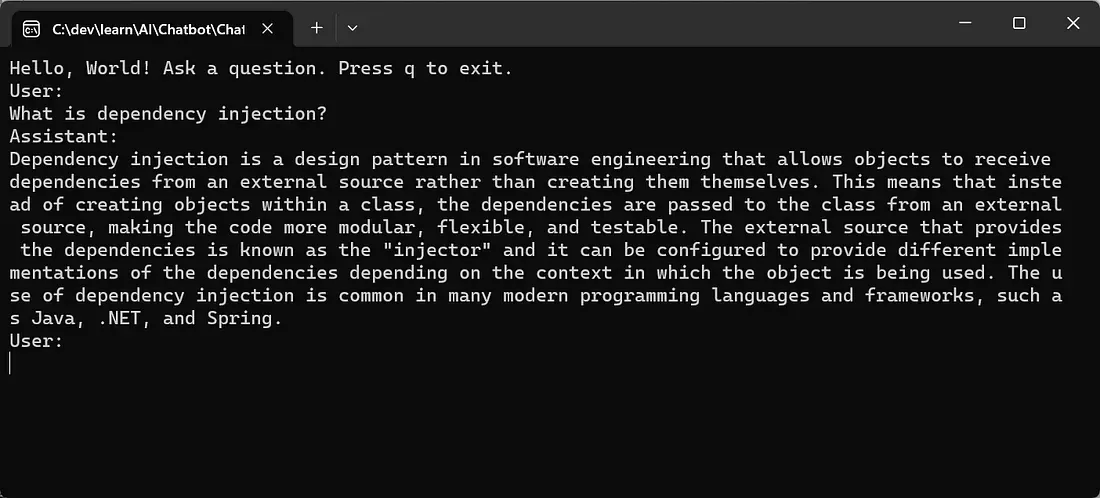
Now you can run the application and chat with the chatbot. You need to type the question in the console and press Enter to send it to the chatbot. The chatbot will respond immediately. You can press q to exit the chatbot.
Add Speech Recognition
Now we have a chatbot that can chat with users. Next, we can add a feature to allow the chatbot to recognize the user’s speech. To do this, we need to use the Azure Speech Service. Add the following code to the VoiceChatbot class:
private static async Task<string> RecognizeSpeechAsync(SpeechRecognizer recognizer)
{
    Console.WriteLine("Say something...");
    var message = string.Empty;
    while (message.Length == 0)
    {
        var result = await recognizer.RecognizeOnceAsync();
        if (result.Reason == ResultReason.RecognizedSpeech)
        {
            message = result.Text;
        }
        OutputSpeechRecognitionResult(result);
    }
    return message;
}

// This method comes from the Azure Speech Service sample code. See https://learn.microsoft.com/azure/cognitive-services/speech-service/get-started-speech-to-text?WT.mc_id=DT-MVP-5001643
private static void OutputSpeechRecognitionResult(SpeechRecognitionResult speechRecognitionResult)
{
    switch (speechRecognitionResult.Reason)
    {
        case ResultReason.RecognizedSpeech:
            Console.Write($"{speechRecognitionResult.Text}");
            break;
        case ResultReason.NoMatch:
            Console.WriteLine($"NOMATCH: Speech could not be recognized.");
            break;
        case ResultReason.Canceled:
            var cancellation = CancellationDetails.FromResult(speechRecognitionResult);
            Console.WriteLine($"CANCELED: Reason={cancellation.Reason}");
            if (cancellation.Reason == CancellationReason.Error)
            {
                Console.WriteLine($"CANCELED: ErrorCode={cancellation.ErrorCode}");
                Console.WriteLine($"CANCELED: ErrorDetails={cancellation.ErrorDetails}");
                Console.WriteLine($"CANCELED: Did you set the speech resource key and region values?");
            }
            break;
    }
}
In the RecognizeSpeechAsync method, we use the SpeechRecognizer class to recognize the user’s speech. The SpeechRecognizer class is a client class provided by the Azure Speech Service SDK. It can recognize the user’s speech and convert it to text. The RecognizeSpeechAsync method will return the recognized text.
We also use a method called OutputSpeechRecognitionResult to output the recognition result to the console. This method comes from the Azure Speech Service sample code. You can find more information about the SpeechRecognizer class and the sample code here.
In the Chat method, we can create the instance of the SpeechRecognizer class and call the RecognizeSpeechAsync method:
Console.WriteLine("Hello, World! Ask a question. Press r and Enter to talk or type your message. Type q or Say 'quit' to exit.");
var speechConfig = SpeechConfig.FromSubscription("YOUR_SPEECH_SERVICE_KEY", "YOUR_SPEECH_SERVICE_REGION");
speechConfig.SpeechRecognitionLanguage = "en-US";
speechConfig.SetProperty(PropertyId.Speech_SegmentationSilenceTimeoutMs, "3000");
speechConfig.SetProperty(PropertyId.SpeechServiceConnection_InitialSilenceTimeoutMs, "1000");
using var audioConfig = AudioConfig.FromDefaultMicrophoneInput();
using var speechRecognizer = new SpeechRecognizer(speechConfig, audioConfig);
Queue<ChatMessage> chatMessages = new();
var systemMessage = new ChatMessage(ChatRole.System, @"You are an AI assistant that helps people find information.");
while (true)
{
    Console.WriteLine("User: ");
    string userMessageString = string.Empty;
    var userInput = string.Empty;
    while (string.IsNullOrWhiteSpace(userMessageString))
    {
        userInput = Console.ReadLine();
        if (userInput?.Trim().ToLower() == "r")
        {
            userMessageString = await RecognizeSpeechAsync(speechRecognizer);
        }
        else
        {
            userMessageString = userInput;
        }
    }
    // Ommitted...
}
In the preceding code, we create a SpeechRecognizer instance and set the SpeechRecognitionLanguage property to en-US. We also set the Speech_SegmentationSilenceTimeoutMs property and the SpeechServiceConnection_InitialSilenceTimeoutMs property. These two properties control the speech recognition. For more information about these properties, see here. You can change the values of these two properties to control the speech recognition.
Azure Speech Service supports many languages. To find out what languages are supported, see here.
Next, we can call the RecognizeSpeechAsync method to recognize the user’s speech. If the user types r and presses Enter, the RecognizeSpeechAsync method will be called. Otherwise, the user’s input will be used as the message.
Add Speech Synthesis
Now we have a chatbot that can recognize the user’s speech. Next, we can use the text-to-speech feature of the Azure Speech Service to allow the chatbot to speak. You can find the supported languages here.
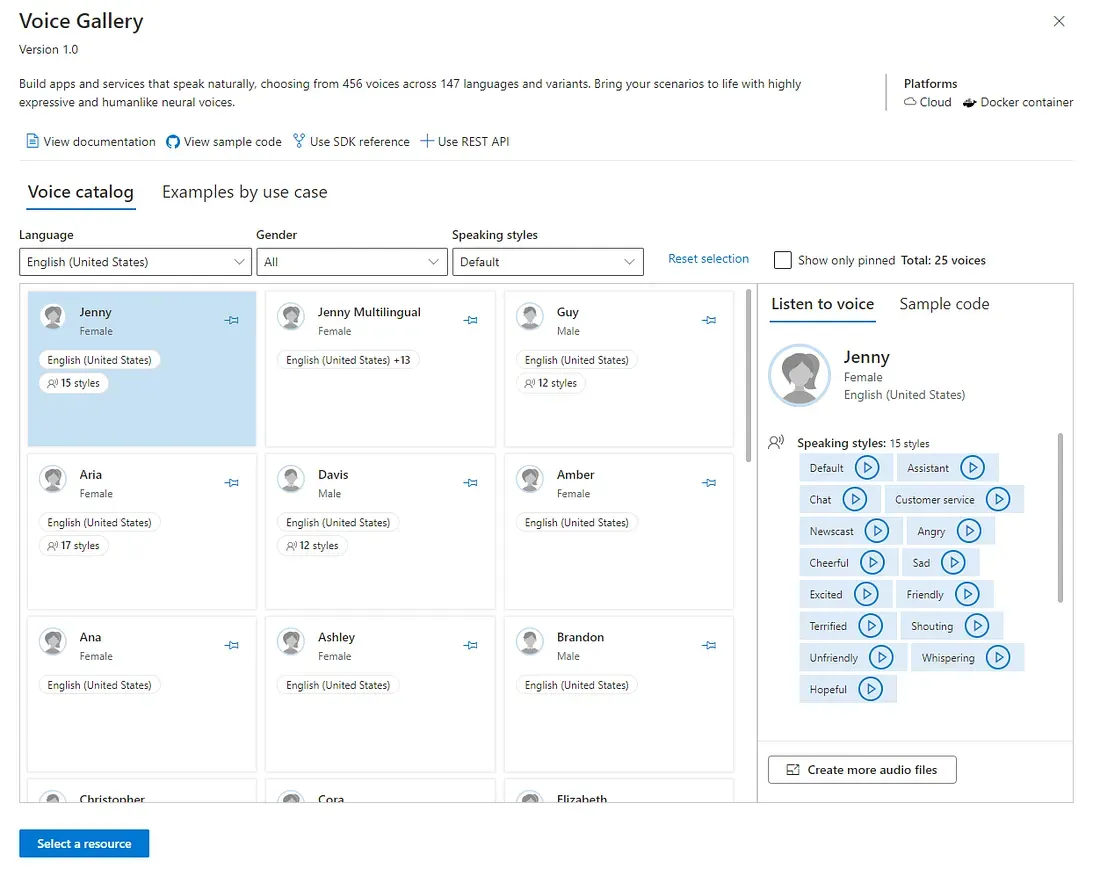
You can choose male voice or female voice per your preference. Microsoft also provides a Voice Gallery so you can easily find the voice you like. You can find the Voice Gallery here.
To use the text-to-speech feature, we need to use the SpeechSynthesizer class. Add the following code to the Chat method in the VoiceChatbot class:
// Choose the voice you like.
speechConfig.SpeechSynthesisVoiceName = "en-US-JaneNeural";
using var speechSynthesizer = new SpeechSynthesizer(speechConfig);
// Ommitted...
await speechSynthesizer.SpeakTextAsync(assistantMessageStringBuilder.ToString());
Now your chatbot can speak!
But there is an issue here. The chatbot will start to speak after the full response is generated. If the response is long, the chatbot will not speak until the full response is returned. This is not a good user experience. We want to make the chatbot speak as soon as possible. Specifically, we want the chatbot to speak the first sentence of the response as soon as possible. To achieve this, we need to understand the structure of the response, and know where the first sentence is.
Split the Response into Sentences
When we use the GetChatCompletionsStreamingAsync method, the response is a streaming response. So the response is not a complete response. We need to wait until the response contains a full stop, or any other punctuation marks that indicate the end of a sentence. Then we can split the response into sentences and make the chatbot speak these sentences one by one.
To do this, we need to create a method to split the streaming response into sentences. Normally, when we see a full stop, we know that a sentence ends. Similarly, when we see a question mark, or an exclamation mark, we can also say that a sentence ends. So the idea is that we can check the response and see if there is a full stop or any other possible punctuation marks.
Create a new class called SentencesHelper, and add the following code to the class:
// Define the punctuation marks that indicate the end of a sentence. To support Chinese, we need to add Chinese punctuation marks as well. Feel free to add more punctuation marks if you want.
private static readonly ISet<char> EndOfSentenceChars = new HashSet<char> { '.', '!', '?', ';', '。', '!', '?', ';', '\n','\r' };
public static async IAsyncEnumerable<string> GetSentences(IAsyncEnumerable<ChatMessage> chatMessages)
{
    var ongoingSentence = new StringBuilder();
    await foreach (var chatMessage in chatMessages)
    {
        var message = chatMessage.Content;
        if (!string.IsNullOrEmpty(message))
        {
            ongoingSentence.Append(message);
            int endOfSentenceIndex = FindEndOfSentenceIndex(message);
            if (endOfSentenceIndex >= 0)
            {
                yield return ongoingSentence.ToString();
                ongoingSentence.Clear();
            }
        }
    }
    if (ongoingSentence.Length > 0)
    {
        yield return ongoingSentence.ToString();
    }
}
private static int FindEndOfSentenceIndex(string text)
{
    for (int i = 0; i < text.Length; i++)
    {
        if (EndOfSentenceChars.Contains(text[i]))
        {
            return i;
        }
    }
    return -1;
}
In the preceding code, we define a set of punctuation marks that indicate the end of a sentence. If a response contains any of these punctuation marks, we can split the response into sentences, then use `yield return` to return the sentences one by one.
Next, we can modify the `Chat` method to use the `SentencesHelper` class. Update the `foreach` loop in the `Chat` method as follows:
await foreach (var streamingChatChoice in streamingChatCompletions.GetChoicesStreaming())
{
    var streamingMessages = streamingChatChoice.GetMessageStreaming();
    await foreach (var sentence in SentencesHelper.GetSentences(streamingMessages))
    {
        assistantMessageStringBuilder.Append(sentence);
        Console.Write(sentence);
        taskExecutor.AddTask(async () => await speechSynthesizer.SpeakTextAsync(sentence));
        _ = Task.Run(async () =>
        {
           _ = await speechSynthesizer.SpeakTextAsync(sentence);
        });
    }
}
Now we use the `SentencesHelper` class to split the response into sentences. Then we use the `SpeechSynthesizer` class to speak the sentences one by one. We also use `Task.Run` to execute the `SpeechSynthesizer` class in another thread. This is because the `SpeakTextAsync` method returns when done synthesizing. If we don’t use another thread to execute the `SpeakTextAsync` method, the chatbot will not show the next sentence until the current sentence is spoken.
However, if you run the code now, sometime you may find that the chatbot may speak the sentences in the wrong order. This is because some sentences are shorter than others, so the short sentences may be spoken before the long sentences. When we run the tasks, we did not control the order of the tasks. Let’s fix this issue.
Control the Order of the Tasks
To control the order of the tasks, we can create a `TaskExecutor` class. By the way, I asked ChatGPT how to create a `TaskExecutor` class, and it gave me some code like the following (I made some changes to the code):
internal class TaskExecutor
{
    private readonly Queue<Func<Task>> _taskQueue = new();
    private readonly Task _taskExecutionTask;
    private readonly CancellationTokenSource _cancellationTokenSource = new();

    public TaskExecutor()
    {
        _taskExecutionTask = Task.Run(TaskExecutionLoop);
    }

    public void AddTask(Func<Task> taskFunc)
    {
        lock (_taskQueue)
        {
            _taskQueue.Enqueue(taskFunc);
        }
    }

    public async Task StartTaskExecution()
    {
        await _taskExecutionTask;
    }

    public void StopTaskExecution()
    {
        _cancellationTokenSource.Cancel();
    }

    private async Task TaskExecutionLoop()
    {
        try
        {
            while (!_cancellationTokenSource.Token.IsCancellationRequested)
            {
                Func<Task> taskFunc;
                lock (_taskQueue)
                {
                    if (_taskQueue.Count == 0)
                    {
                        continue;
                    }

                    taskFunc = _taskQueue.Dequeue();
                }

                try
                {
                    await taskFunc.Invoke();
                }
                catch (Exception ex)
                {
                    // Handle any exception from the task
                    Console.WriteLine($"Task execution error: {ex}");
                }
            }
        }
        catch (OperationCanceledException)
        {
            // Cancellation requested, exit the loop
        }
    }
}
The `TaskExecutor` class is a queue of tasks. When we add a task to the queue, the `TaskExecutor` class will execute the task one by one. The updated `Chat` method is as follows:
public static async Task Chat(OpenAIClient openAiClient)
{
    Console.WriteLine("Hello, World! Ask a question. Press r and Enter to talk or type your message. Type q or Say 'quit' to exit.");
    // Ommitted code
    using var speechSynthesizer = new SpeechSynthesizer(speechConfig);
    using var audioConfig = AudioConfig.FromDefaultMicrophoneInput();
    using var speechRecognizer = new SpeechRecognizer(speechConfig, audioConfig);
    Queue<ChatMessage> chatMessages = new();
    var systemMessage = new ChatMessage(ChatRole.System, @"You are an AI assistant that helps people find information.");
    var taskExecutor = new TaskExecutor();
    // Start the task execution loop in a separate thread
    _ = Task.Run(taskExecutor.StartTaskExecution);
    while (true)
    {
        Console.WriteLine("User: ");
        string userMessageString = string.Empty;
        var userInput = string.Empty;
        while (string.IsNullOrWhiteSpace(userMessageString))
        {
            userInput = Console.ReadLine();
            if (userInput?.Trim().ToLower() == "r")
            {
                userMessageString = await RecognizeSpeechAsync(speechRecognizer);
            }
            else
            {
                userMessageString = userInput;
            }
        }
        if (userInput?.Trim().ToLower() == "quit" || userInput?.Trim().ToLower() == "q")
        {
            Console.WriteLine("Goodbye!");
            taskExecutor.StopTaskExecution();
            break;
        }
        var userMessage = new ChatMessage(ChatRole.User, userMessageString);
        chatMessages.Enqueue(userMessage);
        while (chatMessages.Count > 20)
        {
            chatMessages.Dequeue();
        }
        var options = new ChatCompletionsOptions()
        {
            Temperature = (float)0.7,
            MaxTokens = 300,
            NucleusSamplingFactor = (float)0.95,
            FrequencyPenalty = 0,
            PresencePenalty = 0,
        };
        options.Messages.Add(systemMessage);
        foreach (var message in chatMessages)
        {
            options.Messages.Add(message);
        }
        var response = await openAiClient.GetChatCompletionsStreamingAsync("gpt-35-turbo", options);
        using var streamingChatCompletions = response.Value;
        var assistantMessageStringBuilder = new StringBuilder();
        Console.WriteLine("Assistant: ");
        await foreach (var streamingChatChoice in streamingChatCompletions.GetChoicesStreaming())
        {
            var streamingMessages = streamingChatChoice.GetMessageStreaming();
            await foreach (var sentence in SentencesHelper.GetSentences(streamingMessages))
            {
                assistantMessageStringBuilder.Append(sentence);
                Console.Write(sentence);
                // Add the task to the task queue
                taskExecutor.AddTask(async () => await speechSynthesizer.SpeakTextAsync(sentence));
            }
        }
        Console.WriteLine();
        var assistantMessage = new ChatMessage(ChatRole.Assistant, assistantMessageStringBuilder.ToString());
        chatMessages.Enqueue(assistantMessage);
    }
}
Now the chatbot will speak the sentences in the correct order.
Test the chatbot again. The following is the result:
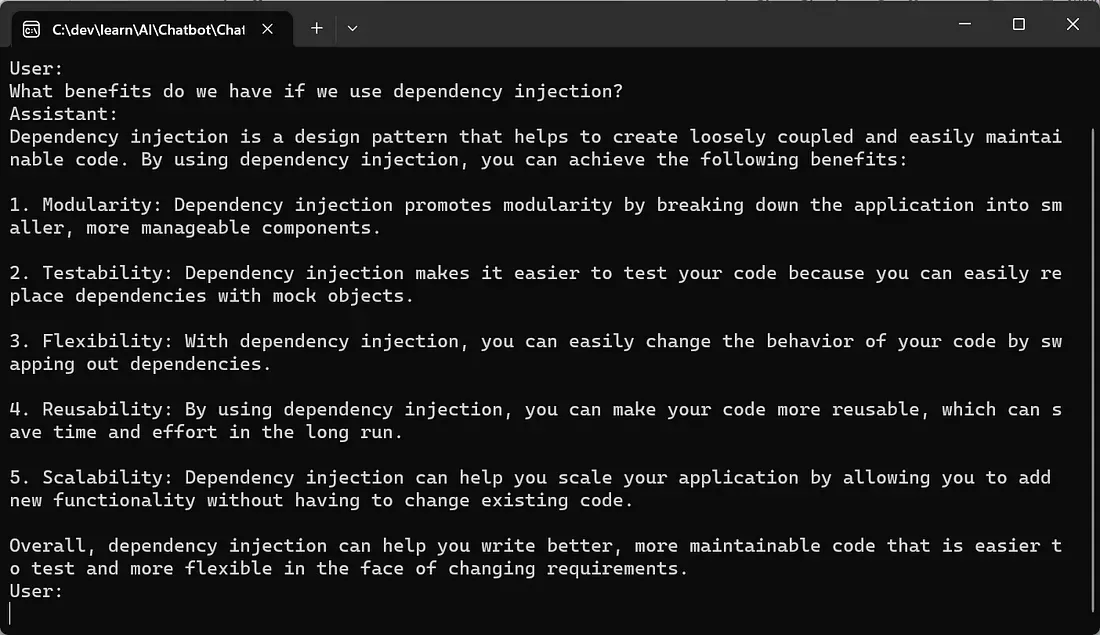
You can hear the chatbot speaking the sentences one by one. Also you can test the speech recognition by pressing `r` and Enter. The chatbot will recognize your speech and speak the response.
Summary
In this article, we have learned how to use the Azure OpenAI API (or OpenAI API) to create a chatbot that can speak and listen. Leveraging the power of the Azure services, you can also specify the emotion of the chatbot. For example, you can use Azure Cognitive Services to analyze the sentiment of the chatbot’s response, and then choose proper speaking styles of the voice. Then the chatbot can have emotions like a human!
The code in this article is available at my GitHub repository: https://github.com/yanxiaodi/MyCodeSamples/tree/main/Chatbot.
Feel free to download and try it out. With the help of ChatGPT and GitHub Copilot, I wrote the code much faster than I expected. I hope you can also try out the Azure OpenAI API and create your own chatbot. Have fun!