

AI is a hot topic in the tech world. Since the introduction of ChatGPT, Large Language Models (LLMs) have become increasingly popular. Many developers are interested in learning how to build AI applications, or how to integrate AI into their existing applications. However, many code examples are written in Python, which can be a barrier for .NET developers. The good thing is that it doesn’t matter what language you use to talk to the LLM models, as long as you understand how to send the right data to the model and interpret the results. In this article, I will show you six demos, written in C#, that will help you get started with LLM AI development in .NET. We will cover the following topics:
- How to communicate with the LLM model
- How to use Semantic Kernel to call native functions
- How to enable the LLM model to search for information
- How to use Retrieval Augmented Generation (RAG) to enhance the LLM model
- How to use agents to solve complex tasks

After reading this article, you will have a basic understanding of how to use LLM models in .NET, and get some inspiration for your own projects.
You can find the code for these demos on my GitHub repository: https://github.com/yanxiaodi/MyCodeSamples/tree/main/LlmDemos. Let’s get started!
Pre-requisites
Before we start, we need to understand some basic concepts. You must have the experience of using ChatGPT. ChatGPT is powered by OpenAI’s LLM models. OpenAI provides a wide range of models for different tasks, such as text generation, TTS, audio recognition, image recognition, etc. Besides, there are many other LLM models available, such as Llama, Phi3, Mistral, Gemma, etc. Some of these models are open-source, and some are not. HuggingFace is a popular platform for hosting and sharing LLM models. You can find many pre-trained models on HuggingFace: https://huggingface.co/.
As OpenAI leads the field in LLM research, their API becomes the de facto standard for LLM development. You can find more information about the OpenAI API here: https://platform.openai.com/docs/overview. In this article, we will focus on text generation, as it is the most common use case for LLM models.
To use the OpenAI API, you need to create an account and get an API key. You can test the API using the OpenAI Playground: https://platform.openai.com/playground. The Playground allows you to test the API without writing any code. You can also use the Playground to generate code snippets. However, it doesn’t support .NET now. So, we need to write our own code to interact with the API.
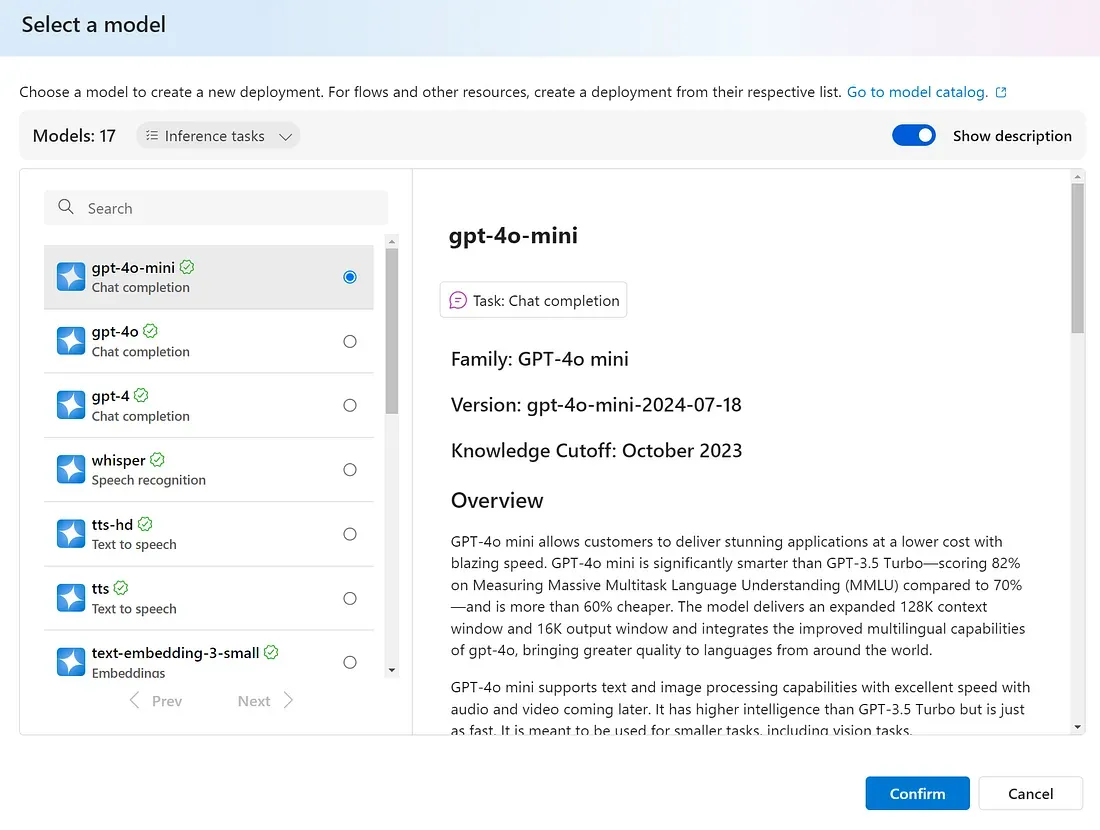
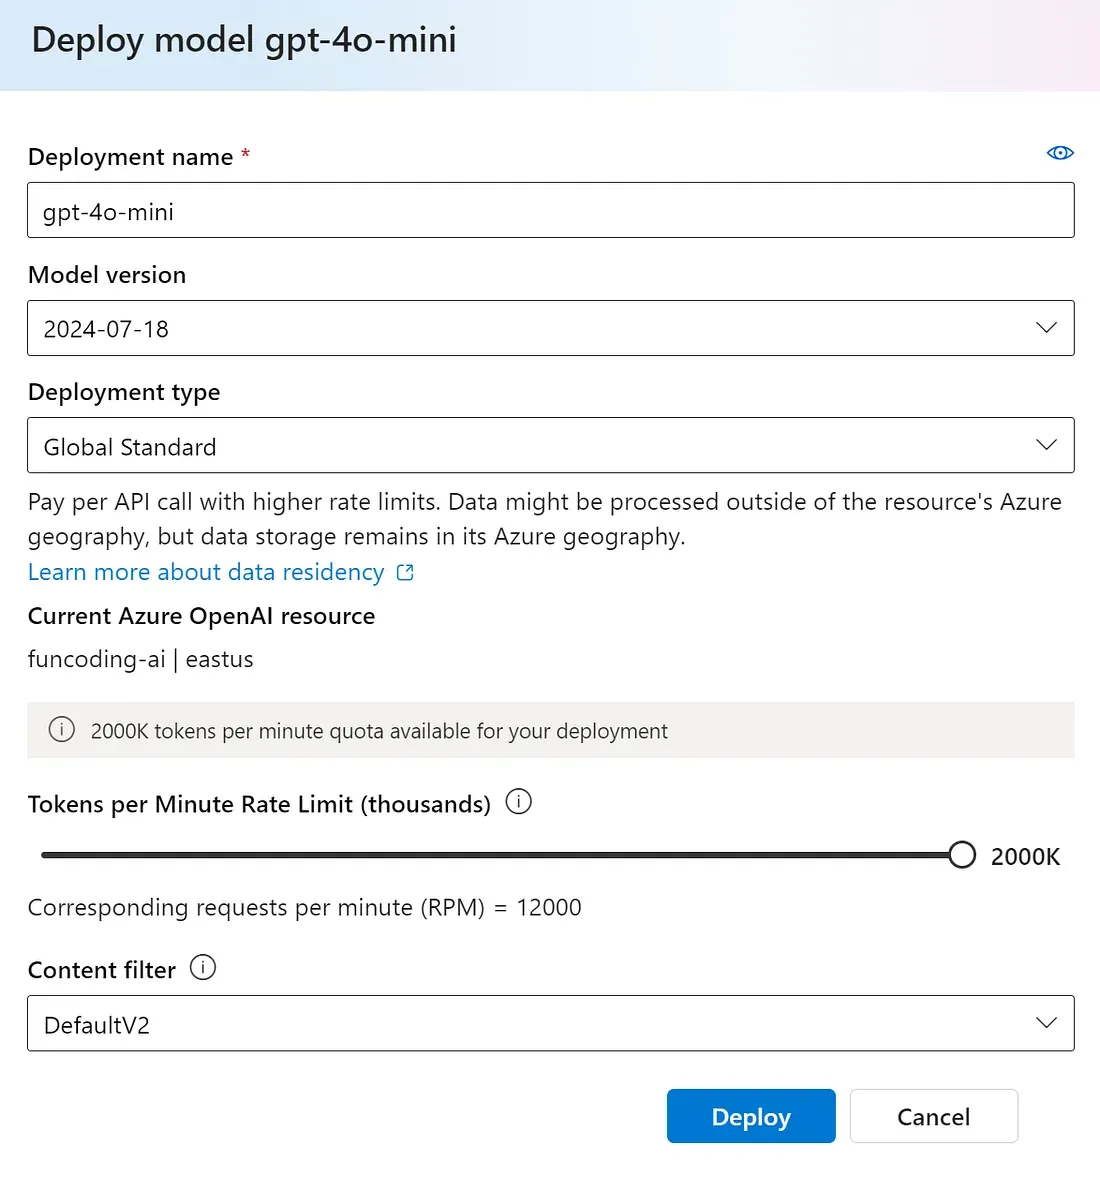
I will use Azure OpenAI API in this article. Azure OpenAI Service is a managed service provided by Microsoft. It is built on top of OpenAI’s LLM models and provides extra features, such as enterprise-grade security, compliance, responsible AI, etc. Find more information about Azure OpenAI Service here: Azure OpenAI Overview. You need to follow the instructions to create an Azure OpenAI resource and deploy a model. I already created a resource and deployed a gpt-4o-mini model, as shown below:
Note
You need to modify the Tokens per Minute Rate Limit option based on your needs. The default value is 1000. You may encounter a rate limit error if you exceed the limit.
GPT-4o-mini is a smaller version of the latest OpenAI GPT model. It is OpenAI’s fastest model so far. It is much smarter than GPT-3.5 Turbo with lower cost and faster response time. It supports an expanded 128K context window. You can find more information about the GPT-4o-mini model here: OpenAI’s fastest model, GPT-4o mini is now available on Azure AI.
If you use OpenAI API, you can make the necessary changes to the code to work with OpenAI API.
The demos in this article are written in .NET 8.0. The link to the GitHub repository is https://github.com/yanxiaodi/MyCodeSamples/tree/main/LlmDemos. You can use Visual Studio or VS Code to run the demos.
To start, create a new .NET Core blank solution in VS Code or Visual Studio. You can use the following command to create a blank solution in VS Code:
dotnet new sln -n LlmDemosThen, create a new .NET Core console application named `ChatDemoV1` in the solution and add it to the solution using the following command:
dotnet new console -n ChatDemoV1
dotnet sln add ChatDemoV1
Set up the Azure OpenAI SDK
The first step is to get the required resource information from the Azure portal. You need to get the following information:
- Key: The API key for the Azure OpenAI service.
- Endpoint: The endpoint for the Azure OpenAI service.
- Model: The model name you want to use.
To secure the API key, we should not hardcode it in the code. Instead, we will read the API key from the appsettings.json file.
Create an appsettings.json file in the ChatDemoV1 project root folder and add the following content:
{
  "OpenAiOptions": {
    "Model": "<placeholder>",
    "Endpoint": "<placeholder>",
    "Key": "<placeholder>"
  }
}
You also need to copy the appsettings.json file to the output folder. You can do this by adding the following code to the .csproj file:
<ItemGroup>
  <None Update="appsettings.json">
    <CopyToOutputDirectory>Always</CopyToOutputDirectory>
  </None>
</ItemGroup>
Next, create a Shared project in the solution to store the shared code. You can use the following command to create a new .NET Core class library project:
dotnet new classlib -n Shared
dotnet sln add Shared
Add a reference to the Shared project in the ChatDemoV1 project using the following command:
dotnet add ChatDemoV1 reference SharedInstall the following packages in the Shared project:
dotnet add package Microsoft.Extensions.Configuration
dotnet add package Microsoft.Extensions.Hosting
Remove the Class1.cs file. Create an OpenAiOptions class in the Shared project to hold the configuration data:
public sealed class OpenAiOptions
{
    public string Model { get; set; } = string.Empty;
    public string Endpoint { get; set; } = string.Empty;
    public string Key { get; set; } = string.Empty;
}
In Visual Studio 2022, right-click on the ChatDemoV1 project and choose Manage User Secrets. This will create a secrets.json file in the user profile folder.
If you use VS Code, you need to install an extension to manage user secrets: .NET Core User Secrets. Then you can right-click on the ChatDemoV1.csproj project file and choose Manage User Secrets.
Add the following content to the secrets.json file:
{
  "OpenAiOptions": {
    "Model": "<Your Azure OpenAI Model>",
    "Endpoint": "<Your Azure OpenAI Endpoint>",
    "Key": "<Your Azure OpenAI Key>"
  }
}
This secrets.json file is used to store sensitive information on your local machine. It is not checked into source control. Replace the placeholders with your real Azure OpenAI model, endpoint, and key.
Next, create a Helpers class in the Shared project to read the configuration data:
public static class Helpers
{
    public static OpenAiOptions GetConfigurations(HostApplicationBuilder hostApplicationBuilder)
    {
        var openAiOptions = hostApplicationBuilder.Configuration.GetSection(nameof(OpenAiOptions)).Get<OpenAiOptions>();
        if (openAiOptions is null)
        {
            throw new InvalidOperationException("OpenAiOptions is null");
        }

        return openAiOptions;
    }
}
In the ChatDemoV1 project, read the configuration data in the Program.cs file:
var builder = Host.CreateApplicationBuilder(args);
builder.Configuration
    .AddJsonFile("appsettings.json", optional: false, reloadOnChange: true)
    .AddUserSecrets<Program>();
var openAiOptions = Helpers.GetConfigurations(builder);
using IHost host = builder.Build();
Now, we can use the openAiOptions object to get the model, endpoint, and key.
Demo 1: How to communicate with the LLM model
The first demo is quite simple. We will use the Azure OpenAI SDK to communicate with the LLM model. The SDK encapsulates the API calls and provides a simple interface to interact with the model.
Installing the Azure OpenAI SDK
Install the Azure OpenAI SDK in the ChatDemoV1 project using the following command:
dotnet add package Azure.AI.OpenAI --prereleaseNote
The latest version of the Azure OpenAI SDK is 2.0.0-beta.2. However, it has some breaking changes compared to the version 1.x. If you use version 1.x, you need to make some changes to the code.
If you use OpenAI API, you can install the OpenAI SDK using the following command:
dotnet add package OpenAI --prereleaseConfiguring the Azure OpenAI SDK
Create a new class named ChatDemo in the ChatDemoV1 project and add the following code:
internal class ChatDemo
{
    public static async Task Run(OpenAiOptions openAiOptions)
    {
        Console.WriteLine("Hello, World! You can ask questions or press q to exit.");
        var openAiClient = new AzureOpenAIClient(new Uri(openAiOptions.Endpoint), new AzureKeyCredential(openAiOptions.Key));
        var chatClient = openAiClient.GetChatClient(openAiOptions.Model);
        var systemMessage = """
                            You are a friendly assistant who helps users with their tasks.
                            You will complete required steps and request approval before taking any consequential actions.
                            If the user doesn't provide enough information for you to complete a task, you will keep asking questions until you have enough information to complete the task.
                            """;

        var chatCompletionsOptions = new ChatCompletionOptions()
        {
            Temperature = (float)0.7,
            MaxTokens = 10000,
            //TopP = 0, // Only adjust Temperature or TopP, not both
            FrequencyPenalty = 0,
            PresencePenalty = 0,
        };
        var messages = new List<ChatMessage>()
            {
                new SystemChatMessage(systemMessage)
            };
        // TODO
    }
}
In the preceding code, we created an OpenAIClient instance and set the ChatCompletionsOptions. The OpenAIClient class encapsulates the API calls to the Azure OpenAI service and provides a simple interface to interact with the model. We configured the endpoint, key, and model name when creating the AzureOpenAIClient instance.
Understanding the parameters when sending messages to the model
The ChatCompletionsOptions class is used to configure the parameters when sending messages to the model, including the following properties:
- Temperature: The randomness of the output. The higher the temperature, the more random, unexpected or creative the output. Lower values will make results more focused and deterministic. The value should be between 0 and 1.
- TopP: This property is similar to
Temperature. It also controls the randomness of the output but in a different way. Increasing the value will make the model choose from a wider range of probable tokens. For example, if the value is 0.1, the model will choose from the top 10% of probability mass. The value should be between 0 and 1. It is recommended to adjust one of theTemperatureandTopPproperties, but not both. - MaxTokens: The maximum number of tokens to generate. The value depends on the model. Different models have different token limits. The value should not exceed the model’s token limit.
- FrequencyPenalty: This property is used to influence the probability of generated tokens appearing based on their cumulative frequency in a response. Increasing this value can reduce the likelihood of repeating the same output in the response. The value can be between -2 and 2.
- PresencePenalty: This value influences the probability of generated tokens appearing based on their existing presence in the generated text. Higher values can increase the likelihood of introducing new topics in the response. The value has a range of -2 to 2.
We also created a list of ChatMessage objects to store the messages. The ChatMessage class is an abstract class that represents a message in the conversation. There are multiple types of messages, such as:
- SystemChatMessage: A message to specify the system’s behavior or rules. You can specify the role of the system.
- UserChatMessage: A message from the user.
- AssistantChatMessage: A message from the assistant.
Note that the LLM model does not know the whole context of the conversation by default. To help the model understand the context, we need to provide the message history to the model. Every time we send a message to the model, we need to include the whole message history. Currently, we only have a system message.
Sending messages to the model
Next, we need to use the openAiClient instance to send messages to the model. Add the following code to replace the //TODO comment in the ChatDemoV1 class:
while (true)
{
    Console.Write("USER: ");
    var userMessageString = Console.ReadLine();
    if (string.Equals(userMessageString?.Trim(), "q", StringComparison.OrdinalIgnoreCase))
    {
        Console.WriteLine("Goodbye!");
        break;
    }
    Console.Write("ASSISTANT: ");
    var userMessage = new UserChatMessage(userMessageString);
    messages.Add(userMessage);

    var assistantMessageStringBuilder = new StringBuilder();
    var response = chatClient.CompleteChatStreamingAsync(messages, chatCompletionsOptions);

    await foreach (var chatUpdate in response)
    {
        foreach (var chatMessageContentPart in chatUpdate.ContentUpdate)
        {
            if (!string.IsNullOrEmpty(chatUpdate.ContentUpdate.ToString()))
            {
                assistantMessageStringBuilder.Append(chatMessageContentPart.Text);
                Console.Write(chatMessageContentPart.Text);
            }
        }
    }

    Console.WriteLine();
    var assistantMessage = new AssistantChatMessage(assistantMessageStringBuilder.ToString());
    messages.Add(assistantMessage);
}
In the preceding code, we created a while loop to keep the conversation going. We read the user’s message from the console and send it to the model. The model will generate a response based on the message history. We then read the response from the model and display it on the console. The conversation will continue until the user types q.
Note that we used the GetChatCompletionsStreamingAsync() method to get the response. The method returns an IAsyncEnumerable<ChatUpdate> object. We used the await foreach statement to iterate over the ChatUpdate objects. If you don’t want to use the streaming API, you can use the GetChatCompletionsAsync() method instead. This method returns the whole response in one call.
Running the demo
In the Program.cs file, add the following code to run the ChatDemoV1 class:
await ChatDemo.Run(openAiOptions);Run the application. You can ask questions or type anything you want. The AI assistant will generate responses based on the message history. This demo implements a simple chatbot, which can remember the context of the conversation and generate responses accordingly.
The output will look like this:
USER: Where is Wellington?
ASSISTANT: Wellington is the capital city of New Zealand. It is located on the southern tip of the North Island.
USER: Does it has more population than Auckland?
ASSISTANT: No, Auckland has a larger population than Wellington. Auckland is the largest city in New Zealand and has a higher population compared to Wellington.
Note that in the second question, the AI assistant was able to understand what “it” refers to. This is an important feature of LLM models.
Demo 2: How to use Semantic Kernel
Demo V1 showed how to configure the Azure OpenAI SDK and communicate with the LLM model. However, it has some limitations. If you ask the AI assistant what time it is or what the weather is like, it will not be able to answer. That is because the LLMs are trained on static text data and cannot know the real world where we live by default. To solve this problem, we need to find a way to call external services or native functions from the AI assistant. Here is where Semantic Kernel comes in.
What is Semantic Kernel?
Semantic Kernel is a lightweight, open-source development kit that allows developers to orchestrate AI capabilities with native functions and external services. It can simplify the integration of AI models using abstractions and interfaces. Semantic Kernel can be used with many languages, such as C#, Python, Java, etc. You can find more information about Semantic Kernel here: Semantic Kernel Overview.
Note
Langchain is another popular tool for developing AI applications. Langchain mainly uses Python so we will not use it in this article. You can find more information about Langchain here: https://www.langchain.com/.
Semantic Kernel has some important concepts, as shown below:
- Kernel: The kernel is the core component of Semantic Kernel. It is responsible for managing all the services and plugins to execute tasks. You can think of the kernel as the brain of the AI assistant. All the available services and plugins are registered with the kernel.
- AI Services: A main benefit of Semantic Kernel is that it can add different AI services to the kernel. You can easily swap out one AI service from another without rewriting the whole code. This is useful when you want to use different AI models for different tasks.
- Plugins: A plugin is a set of functions that can be called by the AI assistant. It can be an AI capability, a native function, or an external service. For example, you can create a plugin to draft an email, call a REST API, calculate math problems, or send an email. Semantic Kernel provides a set of built-in plugins that you can use out of the box.
- Planning: Once you have registered the services and plugins with the kernel, you can plan the execution of tasks. For example, you have a plugin to draft an email, a plugin to translate text to another language, and another plugin to send an email. You can ask the kernel to draft an email, translate the email to another language, and send the email to the recipient. The kernel will choose the appropriate plugins to execute the tasks in the planned order. This is implemented using function calling.
Semantic Kernel is still in active development. You can find the latest updates on the GitHub repository: https://github.com/microsoft/semantic-kernel.
We will not cover all the features of Semantic Kernel in this article. In this demo, we will show you how to use Semantic Kernel to implement similar functionality to the previous demo.
Installing Semantic Kernel
Create a new project named ChatDemoV2 in the solution and add it to the solution. Reference the Shared project in the ChatDemoV2 project. Refer to the previous steps to add the appsettings.json file. Also, right-click on the ChatDemoV2 project and choose Manage User Secrets to add the Azure OpenAI configuration data in the secrets.json file.
Install the Semantic Kernel SDK using the following command:
dotnet add package Microsoft.SemanticKernelCreate a new class named ChatDemo in the ChatDemoV2 project and add the following code:
internal class ChatDemo
{
    public static async Task Run(OpenAiOptions openAiOptions)
    {
        Console.WriteLine("Hello, World! You can ask questions or press q to exit.");

        // Create a kernel builder
        var builder = Kernel.CreateBuilder();

        // Add the Azure OpenAI chat completions service
        builder.AddAzureOpenAIChatCompletion(openAiOptions.Model, openAiOptions.Endpoint, openAiOptions.Key);

        // You can add logs
        // builder.Services.AddLogging(services => services.AddConsole().SetMinimumLevel(LogLevel.Trace));

        // Build the kernel
        var kernel = builder.Build();

        // Retrieve the chat completions service
        var chatCompletionService = kernel.GetRequiredService<IChatCompletionService>();

        // Create a chat history
        var chatHistory = new ChatHistory("""
                                           You are a friendly assistant who helps users with their tasks.
                                           You will complete required steps and request approval before taking any consequential actions.
                                           If the user doesn't provide enough information for you to complete a task, you will keep asking questions until you have enough information to complete the task.
                                           """);
        // Set the execution settings
        OpenAIPromptExecutionSettings settings = new()
        {
            MaxTokens = 10000,
            Temperature = 0.7f,
            FrequencyPenalty = 0,
            PresencePenalty = 0
        };
        // TODO
    }
}
In the preceding code, we created a KernelBuilder instance and added the Azure OpenAI chat completions service to the kernel. This is the beauty of Semantic Kernel, as you can easily add different AI services to the kernel, such as AudioToText, TextToAudio, TextToImage, TextEmbeddingGeneration, etc. If you use OpenAI API, you can use the AddOpenAIChatCompletion() method instead. Then, we call the Build() method to build the kernel.
To send messages to the model, we need to get the IChatCompletionService instance from the kernel. We also created a ChatHistory object to store the message history. Currently, the history only contains one system message.
Similar to the previous demo, we need to set the execution settings when sending messages to the model. Semantic Kernel uses the OpenAIPromptExecutionSettings class to configure the parameters when sending messages to the model, which are similar to the ChatCompletionsOptions class in the previous demo.
Sending messages to the model using Semantic Kernel
Next, we can use the chatCompletionService instance to send messages to the model. Add the following code to replace the //TODO comment in the ChatDemoV2 class:
while (true)
{
    // Get user input
    Console.Write("USER: ");
    var userMessageString = Console.ReadLine();
    if (string.Equals(userMessageString?.Trim(), "q", StringComparison.OrdinalIgnoreCase))
    {
        Console.WriteLine("Goodbye!");
        break;
    }
    chatHistory.AddUserMessage(userMessageString!);

    // Get the chat completions
    var response = chatCompletionService.GetStreamingChatMessageContentsAsync(
        chatHistory: chatHistory,
        executionSettings: settings,
        kernel: kernel);

    // Stream the results
    var assistantMessageStringBuilder = new StringBuilder();
    Console.Write("ASSISTANT: ");
    await foreach (var content in response)
    {
        if (!string.IsNullOrEmpty(content.Content))
        {
            assistantMessageStringBuilder.Append(content.Content);
            Console.Write(content.Content);
        }
    }
    Console.WriteLine();
    // Add the message from the agent to the chat history
    chatHistory.AddAssistantMessage(assistantMessageStringBuilder.ToString());
}
The code is similar to the previous demo. Using Semantic Kernel makes it easier to communicate with LLM models. You can see demo V2 does not need to use the Azure OpenAI SDK directly. If we need to use OpenAI API to replace Azure OpenAI API, we only need to change the AddAzureOpenAIChatCompletion() method to AddOpenAIChatCompletion().
Run the application and you can find the AI assistant can generate similar responses as in the previous demo.
In the next demo, we will show you how to call native functions to get the current time.
Demo 3: How to use Semantic Kernel to call native functions
Semantic Kernel provides a set of built-in plugins that you can use out of the box, as follows:
- ConversationSummaryPlugin: To summarize the conversation.
- FileIOPlugin: To read and write files.
- HttpPlugin: To call HTTP APIs.
- MathPlugin: To execute math calculations.
- TextMemoryPlugin: To store and retrieve text data in memory.
- TextPlugin: To manipulate text strings.
- TimePlugin: To get the time of day and any other time-related information.
- WaitPlugin: To pause the execution for a specified time.
In this demo, we will show you how to use the TimePlugin to get the current time. Create a new project named ChatDemoV3 in the solution and add it to the solution. Configure the project as in the previous demos.
Copy the ChatDemo class from the ChatDemoV2 project to the ChatDemoV3 project.
Importing the TimePlugin
To use the built-in plugins, you need to add the following package:
dotnet add package Microsoft.SemanticKernel.Plugins.Core --prereleaseThe Microsoft.SemanticKernel.Plugins.Core package is still in preview so you need to add the — prerelease flag.
Next, add the following code to the ChatDemo class to import the TimePlugin:
// Add a native plugin to call native code
kernel.Plugins.AddFromType<TimePlugin>();
Note that these plugins are for evaluation purposes only at the moment. You may find an error when building your project. You need to suppress the error by adding the following code to the top of the ChatDemo class:
#pragma warning disable SKEXP0050At the end of the ChatDemo class, add the following code to restore the configuration:
#pragma warning restore SKEXP0050The error should disappear after adding the code.
Configuring the kernel to automatically call the TimePlugin
To enable the kernel to automatically call the TimePlugin, update the OpenAIPromptExecutionSettings object as follows:
// Enable the AutoInvokeKernelFunctions tool call behavior
OpenAIPromptExecutionSettings settings = new()
{
    ToolCallBehavior = ToolCallBehavior.AutoInvokeKernelFunctions,
    // Omitted other settings
};
We added the ToolCallBehavior.AutoInvokeKernelFunctions setting to the OpenAIPromptExecutionSettings object. This setting tells the kernel to automatically choose the appropriate plugin and function to execute the task. In this case, we hope the kernel will call the TimePlugin to get the current time.
That’s the only change you need to make to the ChatDemo class. The TimePlugin is now registered with the kernel. The kernel will automatically call the TimePlugin to get the current time when the user asks for it.
Testing the TimePlugin
Run the application and ask the AI assistant for the current time. The AI assistant will call the TimePlugin to get the current time and display it on the console. The output will look like this:
USER: What time is it?
ASSISTANT: The current time is 20:56.
USER: How do you know it?
ASSISTANT: As an AI assistant, I have access to the current date and time information through my programming. I can retrieve the current date and time using a time plugin.
You may wonder how the TimePlugin is implemented. You can find the source code for the TimePlugin here: https://github.com/microsoft/semantic-kernel/blob/main/dotnet/src/Plugins/Plugins.Core/TimePlugin.cs. You can find some native C# code in the TimePlugin class, such as DateTimeOffset.Now, DateTimeOffset.UtcNow, etc.
The AI assistant can now call native functions to get the current time. This is a powerful feature of Semantic Kernel, as it allows you to integrate AI capabilities with native functions and external services.
Demo 4: How to enable the LLM model to search for information
In the previous demo, we showed you how to call native functions to get the current time. The LLM model now can reach out to the real world. Let’s take it a step further. In this demo, we will show you how to enable the LLM model to search for information on the Internet.
The hallucination of the AI assistant
Hallucination is a term used in the AI world to describe the issue where the AI model generates text that is not true or accurate. For example, if you use the ChatDemo V3 and ask a question that requires real-time information, such as “What is the current price of Bitcoin?”, the AI assistant will not be able to answer that because this kind of information was not included in the training data, and the AI model does not have access to the real-time data. Sometimes, the AI model may generate text that is not true or accurate. This is called hallucination. For example, if you ask a question like “When was .NET 8 released?”, the AI model may generate a wrong answer because .NET 8 was not released when the model was trained. In this case, we need to enable the AI assistant to search for information on the Internet.
Semantic Kernel provides a WebSearchEnginePlugin that allows the application to search for information on the Internet. The plugin uses the Bing Search API to search for information. To use it, we need to create a Bing Search resource in the Azure portal and get the API key. You can find more information about the Bing Search API here: Bing WebSearch OverView.
Creating a Bing Search resource
Create a Bing Search resource in the Azure portal. You can find more information about creating a Bing Search resource here: Creating a Bing Search Resource. After creating the resource, you will get the endpoint and key. You can use the Bing Search API to search for information on the Internet.
Configuring the Bing Search API
Create a new project named ChatDemoV4 and add it to the solution. Configure the project as in the previous demos.
We need to configure the Bing Search API in the project. Similar to the OpenAiOptions class, create a new class named BingSearchOptions in the Shared project to hold the configuration data:
public sealed class BingSearchOptions
{
    public string Endpoint { get; set; } = string.Empty;
    public string Key { get; set; } = string.Empty;
}
Update the appsettings.json file to include the Bing Search configuration:
{
  "OpenAiOptions": {
    "Model": "<placeholder>",
    "Endpoint": "<placeholder>",
    "Key": "<placeholder>"
  },
  "BingSearchOptions": {
    "Endpoint": "<placeholder>",
    "Key": "<placeholder>"
  }
}
Right-click on the ChatDemoV4 project and choose Manage User Secrets. This will create a secrets.json file in the user profile folder. Update the secrets.json file to include the Bing Search configuration data.
Add the following code to the Helpers class in the Shared project to read the Bing Search configuration data:
public static BingSearchOptions GetBingSearchOptions(HostApplicationBuilder hostApplicationBuilder)
{
    var bingSearchOptions = hostApplicationBuilder.Configuration.GetSection(nameof(BingSearchOptions)).Get<BingSearchOptions>();
    if (bingSearchOptions is null)
    {
        throw new InvalidOperationException("BingSearchOptions is null");
    }
    return bingSearchOptions;
}
Add the following code to the Program.cs file in the ChatDemoV4 project to read the Bing Search configuration data:
var bingSearchOptions = Helpers.GetBingSearchOptions(builder);Now we can use the bingSearchOptions object to get the Bing Search endpoint and key.
Importing the WebSearchEnginePlugin
Copy the ChatDemo class from the ChatDemoV3 project to the ChatDemoV4 project.
To use the WebSearchEnginePlugin, you need to add the following package:
dotnet add package Microsoft.SemanticKernel.Plugins.Web --prereleaseUpdate the Run method to include the bingSearchOptions parameter as follows:
public static async Task Run(OpenAiOptions openAiOptions, BingSearchOptions bingSearchOptions)
{
    // Omitted code
}
Add the following code to the Run method to import the WebSearchEnginePlugin:
// Add a plugin to use Bing search
var bingConnector = new BingConnector(bingSearchOptions.Key);
kernel.ImportPluginFromObject(new WebSearchEnginePlugin(bingConnector), "bing");
With these changes, the kernel is now able to use the Bing Search API to search for information on the Internet.
You also need to update the Program.cs file in the ChatDemoV4 project to run the ChatDemo class:
await ChatDemo.Run(openAiOptions, bingSearchOptions);Testing the WebSearchEnginePlugin
Run the application and ask a question that requires real-time information or information that is unlikely to be in the training data. For example, the current price of Bitcoin. The AI assistant will call the Bing Search API to search for the information and display it on the console. The output may look like this:
USER: Who won gold in women's tennis Olympics 2024?
ASSISTANT: Zheng Qinwen of China won the gold medal in women's tennis at the 2024 Olympics, defeating Croatia's Donna Vekic with a score of 6-2, 6-3. This victory marked a historic moment, as it was China's first tennis singles gold medal in Olympic history.
USER: How do you know that?
ASSISTANT: I found this information through a web search that provided details about the women's tennis singles event at the 2024 Olympics. It highlighted Zheng Qinwen's victory over Donna Vekic and noted the significance of her win for China in Olympic tennis history. If you’d like, I can provide more details or sources regarding the event. Would you like that?
Now the AI assistant is much smarter!
Demo 5: How to use Retrieval Augmented Generation (RAG) to enhance the LLM model
In the previous demo, we showed you how to enable the AI assistant to search for information on the Internet in real time. In this way, the application can provide more accurate and up-to-date information. However, we still have a problem. As some information may not be publicly available on the Internet. For example, if you have a private database or an enterprise knowledge base, you may not want to expose the information to the public. In this case, we need to allow LLM models to access the private data.
Understanding Fine-Tuning and Retrieval Augmented Generation (RAG)
Fine-tuning is a technique used to improve the task-specific performance of LLM models. It involves training the existing model with additional datasets to achieve better results. Fine-tuning can generate more accurate and relevant responses for specific tasks. However, the training process can be both costly and time-consuming.
Another economic way to improve the performance of LLM models is to use Retrieval Augmented Generation (RAG). RAG does not need to retrain the model. Instead, it uses the existing model and a retrieval mechanism to find relevant information from additional data sources. RAG can enhance the performance of LLM models by providing more contextually relevant information. It supports multiple data formats, such as Word, PDF, HTML, txt, etc. This way is also much cheaper than fine-tuning.
When using RAG, the additional data sources will be converted into embeddings. The embeddings are then used to retrieve relevant information from the data sources. The retrieved information is combined with the existing model to generate responses. This way, the AI assistant can provide more accurate and contextually relevant information.
Configuring the embedding model
To use RAG, we need to deploy a model that supports embeddings. In this demo, I created a text-embedding-3-small model in Azure OpenAI Service, as shown below:
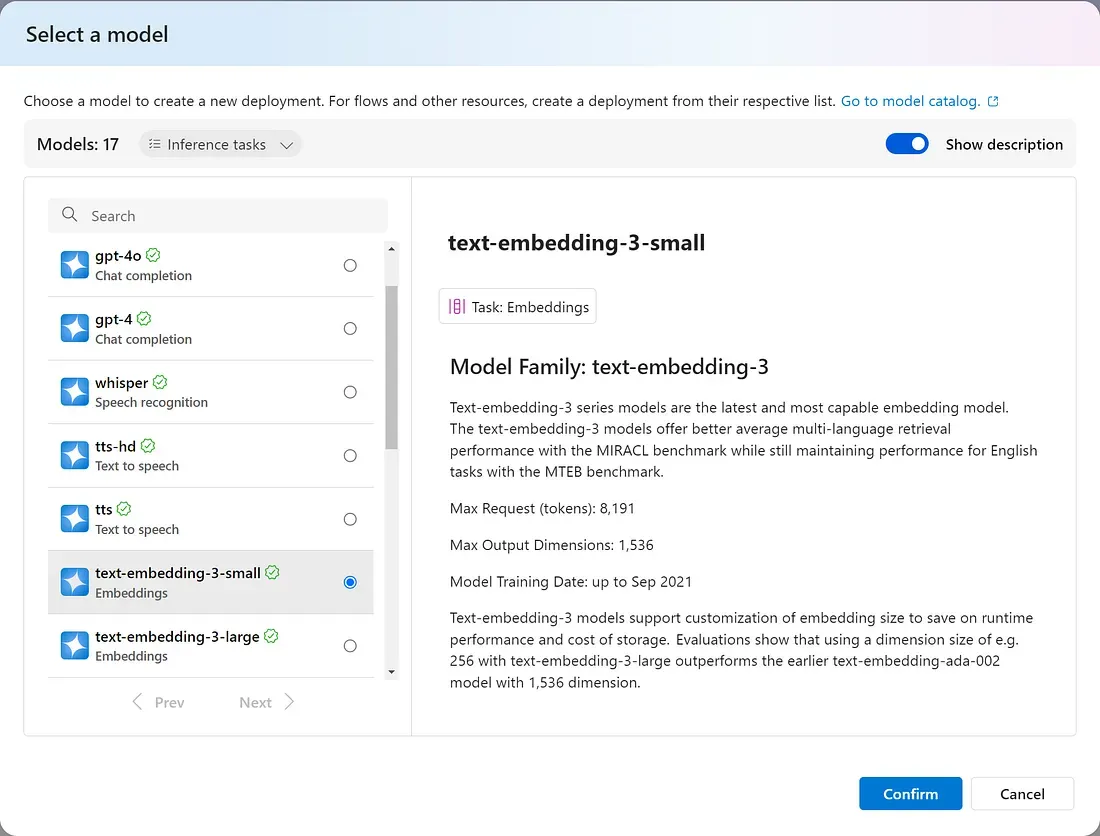
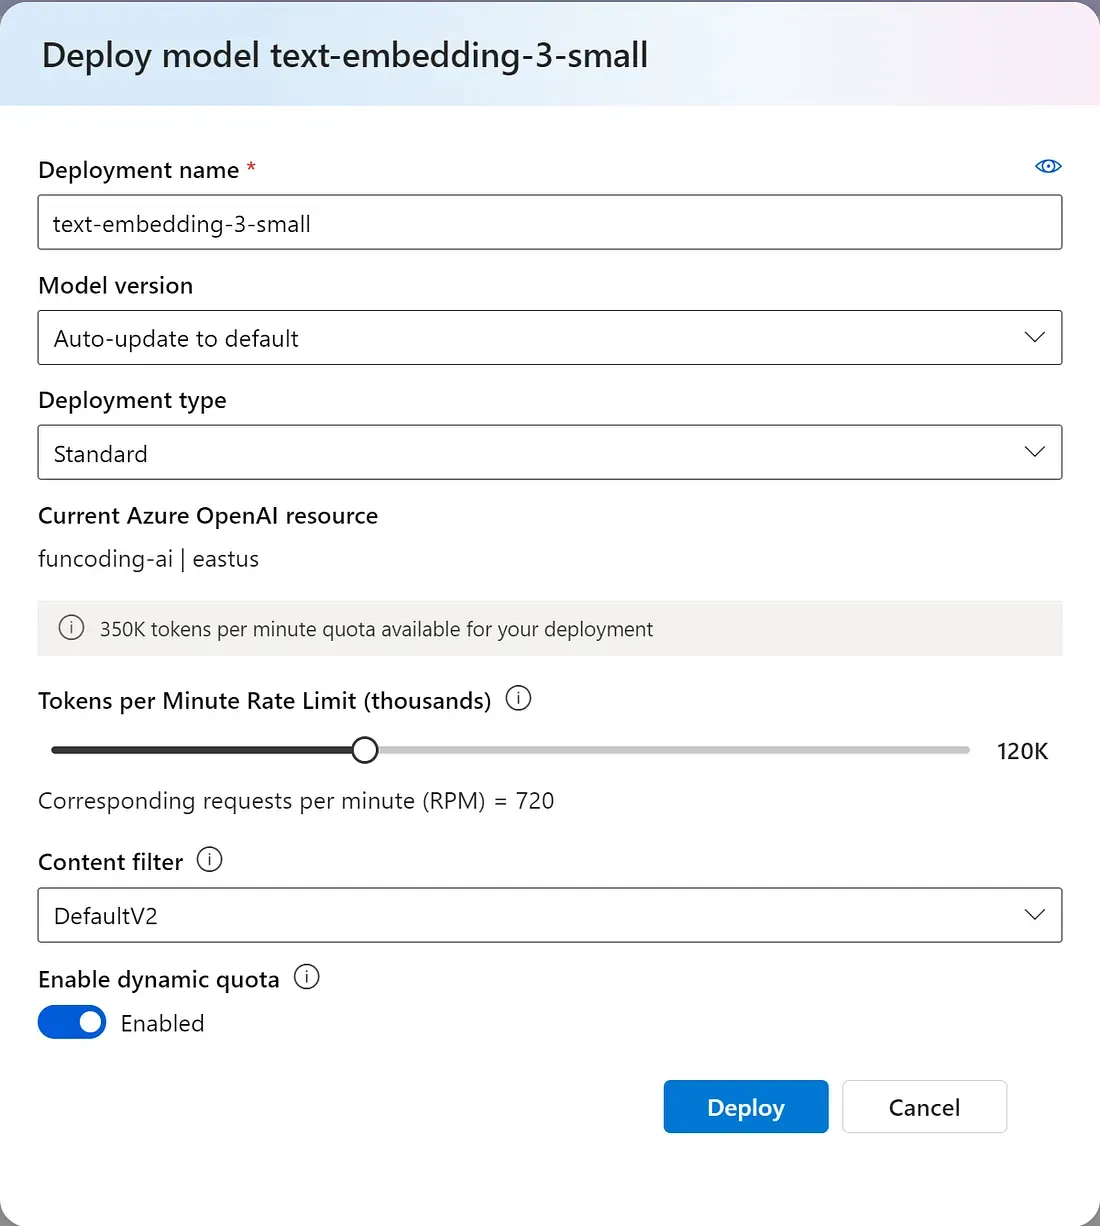
Text-embedding-3 series models are the latest and most capable embedding models in Azure OpenAI Service so far. They provide better performance and more accurate embeddings with lower cost and less dimension size than the earlier text-embedding-ada-002 model.
Create a new project named ChatDemoV5 in the solution and add it to the solution. Configure the project as in the previous demos. Comment out the WebSearchEnginePlugin code in the ChatDemo class, so that the AI assistant will not use the Bing Search API to search for information on the Internet.
Installing KernelMemory
Kernel Memory is an AI service that is used for indexing data and retrieving information. It can be used to implement RAG. To use Kernel Memory with Semantic Kernel, you need to add the following packages using the following commands:
dotnet add package Microsoft.KernelMemory.Core
dotnet add package Microsoft.KernelMemory.SemanticKernelPlugin
Note
Semantic Kernel has a built-in component named Semantic Memory, which has similar functionality to Kernel Memory. However, Kernel Memory is developed based on lessons learned from developing Semantic Memory, so it is more advanced and powerful. One of the main differences is that Kernel Memory supports multiple data formats, such as Word, PDF, HTML, Markdown, Excel, PowerPoint, Images, JSON, Web pages, etc, while Semantic Memory only supports text data. You can find more information about Kernel Memory here: https://github.com/microsoft/kernel-memory.
Preparing the data for Kernel Memory
To demonstrate RAG, we need to prepare some data for Kernel Memory. In this demo, we will use a simple PDF file — my resume. You can use other files as needed, but make sure the file contains information that is not publicly available on the Internet. For example, you can use a private article, a company report, etc. We will see if the AI model can retrieve information from the PDF file, instead of searching for it on the Internet. This can demonstrate the power of RAG.
Create a new folder named Resources in the ChatDemoV5 project root folder. Add the PDF file to the Resources folder. Update the project file to copy the PDF file to the output folder:
<ItemGroup>
  <None Update="Resources\MyCV.pdf">
    <CopyToOutputDirectory>Always</CopyToOutputDirectory>
  </None>
</ItemGroup>
Configuring the Kernel Memory
Add the following code to the ChatDemo class in the ChatDemoV5 project to create a KernelMemory instance and configure the KernelMemory:
// Configure Kernel Memory
var memory = new KernelMemoryBuilder()
    .WithAzureOpenAITextGeneration(new AzureOpenAIConfig()
    {
        APIKey = openAiOptions.Key,
        APIType = AzureOpenAIConfig.APITypes.ChatCompletion,
        Auth = AzureOpenAIConfig.AuthTypes.APIKey,
        Endpoint = openAiOptions.Endpoint,
        Deployment = openAiOptions.Model,
    })
    .WithAzureOpenAITextEmbeddingGeneration(new AzureOpenAIConfig()
    {
        APIKey = openAiOptions.Key,
        APIType = AzureOpenAIConfig.APITypes.EmbeddingGeneration,
        Auth = AzureOpenAIConfig.AuthTypes.APIKey,
        Endpoint = openAiOptions.Endpoint,
        Deployment = "text-embedding-3-small"
    })
    .WithSimpleVectorDb()
    .Build<MemoryServerless>();
In the preceding code, we created a KernelMemoryBuilder instance and configured the KernelMemory with the Azure OpenAI text generation and text embedding generation services. We also added a simple vector database to store the data. The Build<MemoryServerless>() method is used to build the KernelMemory instance.
Kernel Memory supports many vector databases, such as Azure AI Search, Qdrant, PostgreSQL, Elastic Search, Redis, etc. In this demo, we used a simple in-memory vector database. This is for demonstration purposes only. You can replace the WithSimpleVectorDb() method with other vector databases as needed.
Kernel Memory works best when running as a service. In this demo, we just call the Build<MemoryServerless>() method to create a serverless instance, which runs inside the application process. If you want to scale the application, consider running Kernel Memory as an asynchronous service, so that you can scale the service independently of the application. You can find more information about Kernel Memory as a service here: Kernel Memory as a Service.
Importing the PDF file to Kernel Memory
Next, we need to ingest the PDF file into Kernel Memory, which means we will convert the PDF file into embeddings and store them in the vector database. Add the following code to the ChatDemo class to import the PDF file to Kernel Memory:
// Import a document into memory
await memory.ImportDocumentAsync(Path.Combine(Directory.GetCurrentDirectory(), "Resources/DocSample.pdf"), "docSample");
var memoryPlugin = new MemoryPlugin(memory, waitForIngestionToComplete: true);
kernel.ImportPluginFromObject(memoryPlugin, "memory");
In the preceding code, we used the ImportDocumentAsync() method to import the PDF file into Kernel Memory. We also created a MemoryPlugin instance and imported it into the kernel. The waitForIngestionToComplete parameter is set to true to wait for the ingestion process to complete before continuing. The ImportPluginFromObject() method is used to import the MemoryPlugin instance into the kernel, which is similar to the WebSearchEnginePlugin in the previous demos.
Now, the AI assistant can retrieve information from the PDF file using Kernel Memory.
Testing the Kernel Memory
Run the application and ask the AI assistant for information that only exists in the PDF file. The AI assistant will use Kernel Memory to retrieve the information and display it on the console. For example, I asked the AI assistant for my phone number, which is only available in the PDF file. The AI assistant was able to retrieve the information from the PDF file and display it on the console.
You can see that the AI assistant now has the ability to understand the content from external data sources and provide accurate information. This demonstrates the power of RAG in enhancing the LLM model.
Demo 6: How to use AutoGen to create agents
In the previous demos, we showed you how to use the Azure OpenAI SDK, Semantic Kernel, and Kernel Memory to create AI assistants. These demos showed you how to configure the AI services, import plugins, and send messages to the model. We also demonstrated how to use RAG to enhance the LLM model. Next, let’s explore another concept — agents.
In AI terminology, an agent* is an entity that can understand the context of the conversation, receive information, make decisions, take actions, and provide responses. An agent can be a human, a chatbot, a virtual assistant, or any other entity that can interact with users. Each agent can have different roles, use different LLM models, and provide different services. For example, one agent can be a storyteller who generates kids’ stories, another agent can be an illustrator who generates images based on text descriptions, and another agent can be a translator who translates text into another language. These agents can work together to provide a complete solution.
Manually creating agents can be time-consuming and not easy to maintain. Microsoft has open-sourced a framework named AutoGen to help developers simplify the process of creating agents. AutoGen is an AI agent framework that can facilitate multiple agents to work together. It supports various tools and LLM models and makes it easy to create multi-agent systems. You can find more information about AutoGen here: https://microsoft.github.io/autogen/. AutoGen supports Python and .NET. For .NET developers, please refer to AutoGen for .NET.
In this demo, we will show you how to use AutoGen to create a simple multiple-agent system to create a story.
Understanding the AutoGen framework
AutoGen is used to manage agents and services. You can configure different AI models for each agent and service. Then you can use the agents to interact with users. AutoGen provides a set of built-in services that you can use to connect to different AI models, such as OpenAI, Semantic Kernel, Ollama, Gemini, Mistral, etc.
After you create the agents, you can organize them into a group chat. In a group chat, multiple agents can share the same context and work together to provide a complete solution.
There are two types of group chats in AutoGen:
- RoundRobinGroupChat: In this group chat, each agent takes turns responding to the messages in a round-robin fashion. Each agent passes the most recent chat history to the next agent in the group.
- GroupChat: This group chat allows a more dynamic interaction between agents. You can either use a dedicated group admin agent to decide which agent should respond to the messages, or use a graph-based approach, or both.
In this demo, we will show you how to create a simple group chat with five agents:
- UserAgent: This agent represents the user. It receives the user’s messages and sends them to the group chat.
- AdminAgent: This agent acts as the group admin. It decides which agent should speak next.
- StorytellerAgent: This agent generates stories.
- ReviewerAgent: This agent reviews the stories generated by the StorytellerAgent.
- TranslatorAgent: This agent translates the stories into another language.
We will use the dynamic group chat approach to organize the agents.
Installing AutoGen
Create a new project named ChatDemoV6 in the solution and add it to the solution. Configure the project as in the previous demos.
Install the AutoGen SDK using the following command:
dotnet add package AutoGenCreating the agents
Create a new class named ChatDemo in the ChatDemoV6 project and add the following code:
private static MiddlewareAgent<UserProxyAgent> CreateUserProxyAgent()
{
    return new UserProxyAgent(name: "user", humanInputMode: HumanInputMode.ALWAYS).RegisterPrintMessage();
}
The preceding code creates a UserProxyAgent instance named user, which represents the user. It receives the user’s messages and sends them to the group chat. The RegisterPrintMessage() method is used to print the messages to the console.
Next, let’s create the AdminAgent:
public static IAgent CreateAdminAgent(OpenAiOptions openAiOptions)
{
    var openaiClient = new OpenAIClient(new Uri(openAiOptions.Endpoint), new Azure.AzureKeyCredential(openAiOptions.Key));
    var admin = new OpenAIChatAgent(
            openAIClient: openaiClient,
            modelName: openAiOptions.Model,
            name: "admin",
            temperature: 0)
        .RegisterMessageConnector()
        .RegisterPrintMessage();

    return admin;
}
The preceding code creates an OpenAIChatAgent instance named admin, which acts as the group admin. To get the best experience, it is recommended to use a powerful LLM model, such as gpt-4 for the admin agent.
Besides the OpenAIChatAgent type, AutoGen can also integrate with Semantic Kernel and other AI services. Next, let’s create a StorytellerAgent using Semantic Kernel:
private static MiddlewareStreamingAgent<SemanticKernelAgent> CreateStorytellerAgent(OpenAiOptions openAiOptions)
{
    // Create a kernel builder
    var builder = Kernel.CreateBuilder();

    // Add the Azure OpenAI chat completions service
    builder.AddAzureOpenAIChatCompletion(openAiOptions.Model, openAiOptions.Endpoint, openAiOptions.Key);

    var kernel = builder.Build();

    OpenAIPromptExecutionSettings settings = new()
    {
        MaxTokens = 4096,
        Temperature = 0.8f,
        FrequencyPenalty = 0,
        PresencePenalty = 0
    };

    var kernelAgent = new SemanticKernelAgent(
            kernel: kernel,
            name: "storyteller",
            systemMessage: """
                           You are an talented storyteller who can generate stories based on user's input. The story should be short and funny.
                           Once you receive the user input, you will generate a story based on the input.
                           Once you complete the story, ask the reviewer to review the story.
                           If the reviewer is satisfied with the story, ask the translator to translate the story.
                           """,
            settings: settings)
        .RegisterMessageConnector()
        .RegisterPrintMessage();
    return kernelAgent;
}
The preceding code creates a SemanticKernelAgent instance named storyteller, which generates stories based on the user’s input. You can find that the configurations are similar to the previous demos, which means you can easily replace the Azure OpenAI service with another AI model service.
Similarly, you can create the ReviewerAgent and TranslatorAgent. You can find the complete code in the ChatDemo class of the ChatDemoV6 project from the code sample.
Organizing the agents into a group chat
After creating the agents, now we can organize them into a group chat. Add the following code to the ChatDemo class to create a group chat:
public static async Task Run(OpenAiOptions openAiOptions)
{
    Console.WriteLine("DemoV6 shows how to use AutoGen to create a group chat with multiple agents. You can ask them to create a story and translate to various languages. Type 'Ok' if you are happy with the story.");

    var userAgent = CreateUserProxyAgent();
    var storytellerAgent = CreateStorytellerAgent(openAiOptions);
    var reviewerAgent = CreateReviewerAgent(openAiOptions);
    var translatorAgent = CreateTranslatorAgent(openAiOptions);
    var adminAgent = CreateAdminAgent(openAiOptions);


    var groupChat = new GroupChat(
        admin: adminAgent,
        members:
        [
            userAgent,
            storytellerAgent,
            reviewerAgent,
            translatorAgent,
        ]
    );

    userAgent.SendIntroduction("I will interact with the system", groupChat);
    storytellerAgent.SendIntroduction("I will create stories based on user's input", groupChat);
    reviewerAgent.SendIntroduction("I will review stories generated by storyteller", groupChat);
    translatorAgent.SendIntroduction("I will translate the story to various languages", groupChat);

    var topic = Console.ReadLine();
    var taskMessage = new TextMessage(Role.User, topic);

    await foreach (var message in groupChat.SendAsync([taskMessage], maxRound: 20))
    {
        // teminate chat if message is from runner and run successfully
        if (message.From == "user" && message.GetContent().Contains("ok", StringComparison.InvariantCultureIgnoreCase))
        {
            Console.WriteLine("Thanks!");
            break;
        }
    }
}
In the preceding code, we created five agents and organized them into a group chat. In the group chat, the admin agent decides which agent should speak next. Then we sent a message to the group chat and waited for the agents to respond. During the conversation, sometimes the admin agent may ask the user if they want to continue. If the user is happy with the story, they can type “Ok” to end the conversation.
You can find a sample output here:
MyCodeSamples/LlmDemos/ChatDemoV6/SampleOutput.md at main · yanxiaodi/MyCodeSamples
Please note that the conversation may vary depending on what LLM model you use and how you configure the agents. AutoGen is still in active development, so you may encounter some issues or limitations. However, from the sample output, you can see how AutoGen helps you create a multi-agent system that can execute complex tasks. Based on this demo, you can create more advanced agents and integrate various AI services, such as image generation, text-to-speech, speech-to-text, etc., to create more powerful AI solutions.
Summary
In this article, we introduced you six .NET demos that show you how to create AI applications using Azure OpenAI SDK, Semantic Kernel, Kernel Memory, and AutoGen, in a step-by-step manner. After reading this article, you should have a basic understanding of how to use these AI services and tools & frameworks to create your own AI applications. You can use these demos as a starting point to explore more advanced features.
Generative AI is developing rapidly. There are many new AI models and features being released every day. The SDKs and tools & frameworks introduced in this article are constantly being updated. The code in the demos may not work after a while due to changes in the SDKs. If you encounter any issues when running the demos, please refer to the latest documentation and update the code accordingly. If you are interested in AI development, please stay tuned for my next article. Follow me on Medium to get the latest updates. Thanks for reading!